ラスティックスタイルの独立型キッチン (塗装フローリング) の写真
絞り込み:
資材コスト
並び替え:今日の人気順
写真 1〜12 枚目(全 12 枚)
1/4

Our client, with whom we had worked on a number of projects over the years, enlisted our help in transforming her family’s beloved but deteriorating rustic summer retreat, built by her grandparents in the mid-1920’s, into a house that would be livable year-‘round. It had served the family well but needed to be renewed for the decades to come without losing the flavor and patina they were attached to.
The house was designed by Ruth Adams, a rare female architect of the day, who also designed in a similar vein a nearby summer colony of Vassar faculty and alumnae.
To make Treetop habitable throughout the year, the whole house had to be gutted and insulated. The raw homosote interior wall finishes were replaced with plaster, but all the wood trim was retained and reused, as were all old doors and hardware. The old single-glazed casement windows were restored, and removable storm panels fitted into the existing in-swinging screen frames. New windows were made to match the old ones where new windows were added. This approach was inherently sustainable, making the house energy-efficient while preserving most of the original fabric.
Changes to the original design were as seamless as possible, compatible with and enhancing the old character. Some plan modifications were made, and some windows moved around. The existing cave-like recessed entry porch was enclosed as a new book-lined entry hall and a new entry porch added, using posts made from an oak tree on the site.
The kitchen and bathrooms are entirely new but in the spirit of the place. All the bookshelves are new.
A thoroughly ramshackle garage couldn’t be saved, and we replaced it with a new one built in a compatible style, with a studio above for our client, who is a writer.
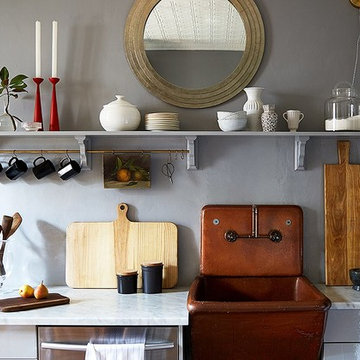
The Makeover Process -- Like a lot of other old houses, ours had seen some less-than-sympathetic renovations over the years. A while back I documented my entryway makeover, and since then I’ve been making my way through the house, one project at a time. With a few successes under our belt, my husband and I decided to take on one of the most challenging rooms in our home: the kitchen. By keeping the design simple and breaking the project down into manageable parts, we were able to transform the space on a fairly modest budget and dream up some ingenious solutions along the way.
Check out the step-by-step evolution of my kitchen from a tired mess to an eclectic and functional space.
Photo by Manuel Rodriguez
Asier Rua
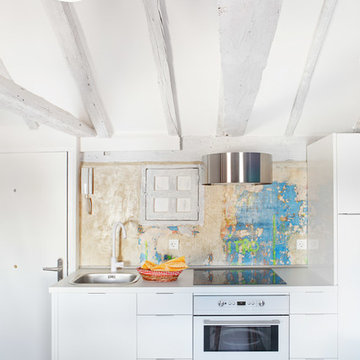
マドリードにあるお手頃価格の中くらいなラスティックスタイルのおしゃれなキッチン (ドロップインシンク、フラットパネル扉のキャビネット、白いキャビネット、人工大理石カウンター、マルチカラーのキッチンパネル、シルバーの調理設備、塗装フローリング、アイランドなし) の写真
マドリードにあるお手頃価格の中くらいなラスティックスタイルのおしゃれなキッチン (ドロップインシンク、フラットパネル扉のキャビネット、白いキャビネット、人工大理石カウンター、マルチカラーのキッチンパネル、シルバーの調理設備、塗装フローリング、アイランドなし) の写真
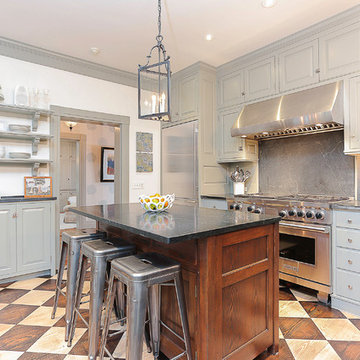
ニューヨークにある高級な中くらいなラスティックスタイルのおしゃれなキッチン (エプロンフロントシンク、レイズドパネル扉のキャビネット、グレーのキャビネット、塗装フローリング、シルバーの調理設備、ソープストーンカウンター、白いキッチンパネル、石スラブのキッチンパネル) の写真
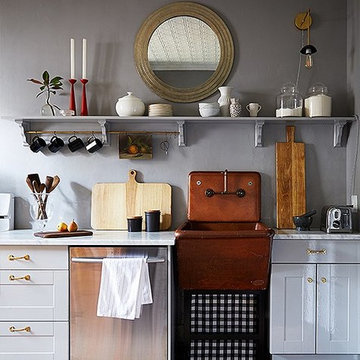
Step 1: The Cabinets -- To replace what we took out, we installed cabinets that I primed with my favorite primer, after the makeover was complete. I wanted a monochromatic look for the space, so I choose to paint the walls and the cabinets the same color, Benjamin Moore’s Silver Half Dollar, choosing a flat finish for the walls and a high-gloss oil paint for the cabinets. The durability, cleanability, and supersmooth finish of oil paint make it my first choice for cabinets. We added a lot of storage on the opposite wall (more on that below), so I opted for a single open shelf in place of upper cabinets to keep the feel more airy.
Photo by Manuel Rodriguez
Step 3: A Painted Backsplash -- In place of a tile backsplash, I painted the lower portion of the wall in the same high-gloss oil paint I used on the cabinets, which provided a subtle contrast to the flat finish I’d used on the rest of the wall. It was a simple and cost-effective alternative to tile, and it stands up beautifully to splashes and splatters.
Photo by Manuel Rodriguez
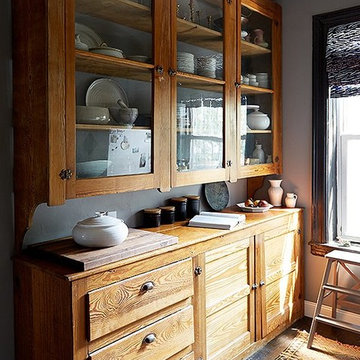
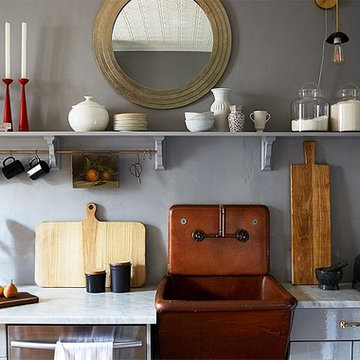
Step 5: Add Vintage Storage -- We found a huge Southern pine butler’s pantry in a vintage shop a couple of summers ago that we got for a steal. Luckily we were able to store it at my in-laws’ house until we were ready to use it. This piece was a fantastic find because it looks as if it could have been original to the house and it accommodates a ton of storage!
Photo by Manuel Rodriguez
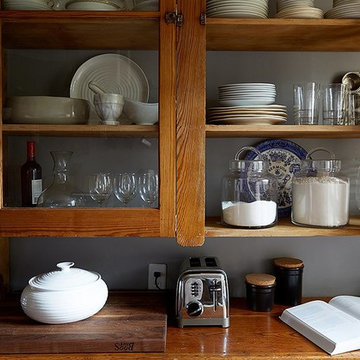
Tip: It’s a good idea to price out cabinet options. Sometimes a vintage piece, like this antique pin cabinet, is more affordable than installing new cabinetry.
Photo by Manuel Rodriguez
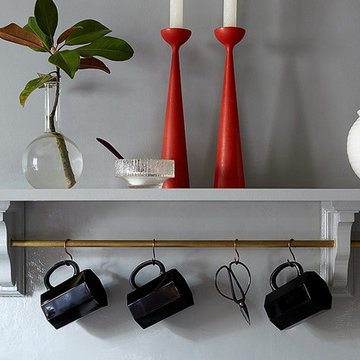
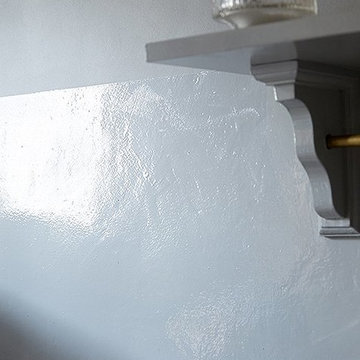
Step 2: Open Shelving (with a Twist) -- I made the shelf using a board and a few wood brackets that I found at the hardware store. I primed and painted them with the same high-gloss oil paint I used for the cabinets. Under the shelf I added a brass rod (another hardware-store find) and S-hooks for coffee cups. To attach the rod to the shelf, I used a drill bit the same diameter as the rod to make holes through the wood brackets and then threaded the pipe through.
Photo by Manuel Rodriguez
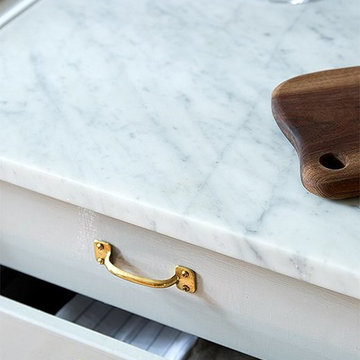
Step 4: Countertops -- For the countertops we used Carrara marble, a surprisingly affordable option. I know opinions vary widely when it comes to Carrara as a surface, but here’s what I’ve found:
First, a honed finish is more forgiving than a supershiny surface. Because our kitchen is far from formal, I think the lower sheen works well.
Second, sealing your marble really does protect it, and it’s simple to do. You just wipe on the liquid sealer and let it dry. The directions say to apply the sealer two or three times a year, and that’s what I’ve been doing. Even though we’re not at all precious with the surface I haven’t had any issues with scratches or stains.
Photo by Manuel Rodriguez
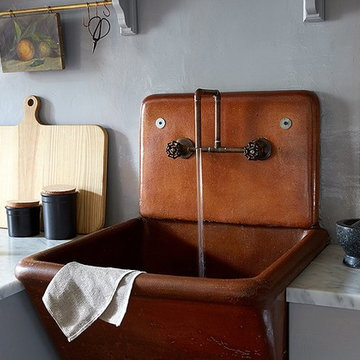
Step 6: Calling in the Pros -- One of the most striking things in our kitchen is the huge terracotta sink made by the Brooklyn-based Charles Graham Chemical Pottery Works around the turn of the 20th century. We’d bought the sink in upstate New York before we started working on the kitchen. Installing the sink was quick work for our plumber, who also fabricated a faucet out of copper pipes to fit the irregularly wide span between the knobs. When it comes to skilled trades like plumbing and electrical it’s always better to hire a pro!
Photo by Manuel Rodriguez
Tip: Even if you’re not up for a whole kitchen renovation, painting cabinets, making a decorative shelf, or incorporating some vintage pieces as storage are all simple ways to update the look of a tired kitchen.
Photo by Manuel Rodriguez
ラスティックスタイルの独立型キッチン (塗装フローリング) の写真
1