Fireplace Makeovers!!! Share your own fireplace makeovers in this thread, so others can get inspired!!
(please excuse christmas clutter) :)

コメント (59)

mpoulsom
質問の投稿者11年前Thank you Dytecture! It's hard to be original.....I'm sure someone has done it before and somewhere though! It was one of those "spur of the moment", "ran into some materials" kind of things and we decided it could work. We love it. :)mpoulsom
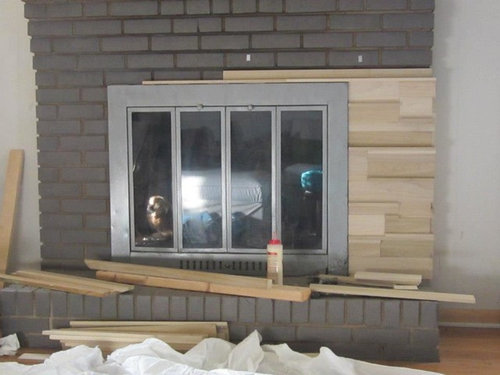
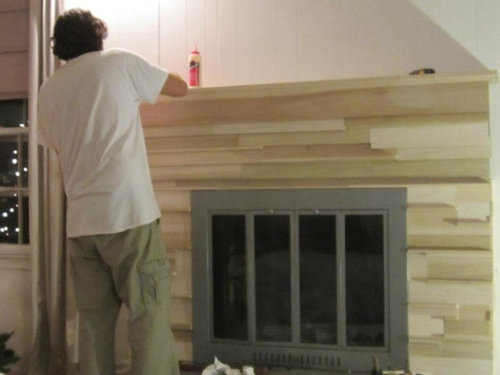
質問の投稿者11年前well, Jane Kennedy, we did not remove the brick, but placed the wood on top of it! So it's all fine and dandy! :) PRO
PROBrown Bros. Masonry
11年前We've never veneered any with wood before but we have veneered many with stone.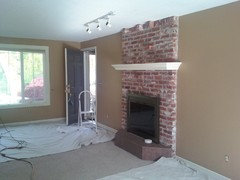


4isablessing
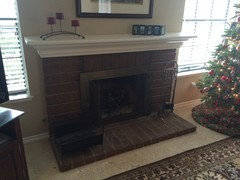
11年前最終更新:11年前This is my very red brick fire place. I don't have any budget to reface it.. but if someone can give me ideas on how to make it brighter. I think we should lighten the grout for a start.. what else can i do? Can i paint the cement mantle a brighter color? White/Cream? And maybe get rid of the brass by painting over it? Chime in.. i would love to hear from those who had the same issue.
mpoulsom
質問の投稿者11年前Yes you can paint the concrete and the brass....you can use spray paint on the brass and concrete paint on the mantel.
Have you considered just painting the brick itself? It will totally change the room. Look up painted brick fireplaces in the photo section. There are a lot of them and can totally change the look. Or look-up white-washing a fireplace. That can look good as well. PRO
PROBrokerInTrust Real Estate - Jane Kennedy
11年前First take away all of the items currently on the fireplace so you can better see what you have to work with. If you like the brick but want to tone it down, you can mist it with watered down paint in a neutral light shade, using a sprayer, to give a light wash to the brick but still allow the texture and the variations of brick tone to show through. This allows to you make subtle changes and not regret a big dramatic change. It will soften the look of the brick and will also lighten the grout color if you make sure that area is misted as well. You can keep layering on the mist until you are happy with the results.
You can then beef up the mantle making it visually heavier to balance all the brick. You can wrap it with wood that is left rustic or wrap it with moulding painted for a more traditional feel.
The alcove where you have the Dura flame logs would look a whole lot better if you actually stored nicely cut to length firewood. As for the Brass fireplace screen it does jump out at you. If you're on a tight budget, you can find some heat resistant paint and hope to make the brass disappear. Better still would be to find a smaller, different one to fit inside the fireplace opening rather than the one you have that larger than the opening and is installed on the face of the fireplace. PRO
PRODenny Shuty
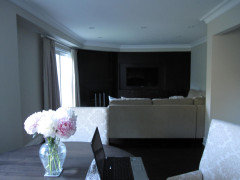
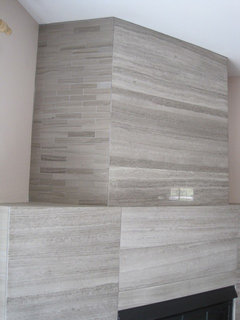
11年前BrokerIntel - I like your solution. I have a similar tiered corner fireplace that is vexing!!! Only mine has 3 mantels - like a wedding cake, and the chimney goes all the way up to the 18' ceiling separating the living room from the stairwell.
I redid the tile, which I love, and had the bottom tier clad in wood, but those top two tiers are not an asset.. It is just drywall with rounded corners/edges. I didn't want to box them in too, so all I could think of at the time was papering them with a faux leather.
Any suggestions???

- PRO
BrokerInTrust Real Estate - Jane Kennedy
11年前Your pictures are very helpful!
At first glance, making the "stepped area" a dark color by papering it in faux leather... you've added "weight" to the top of the fireplace mantle area which to me, is not the best solution. You also have
a lot going on there, between the stepped over mantle area, angled stair railing & handrails and color changes.
If you think the two additional tiers do not serve any purpose or function, you could remove them/cut them back to the vertical boxed in chimney and complete the drywall repair to the stairwell wall and the base of the vertical chimney. You could then fill in the horizontal area between your wood mantle and the chimney with more oak veneered plywood (that appears to be the material you have used). I don't think it will be difficult to tie in the new oak plywood to what you already have.
You will leave a large flat area for display but I would be cautious on the size/quantity of items displayed.
Another option would be to continue the middle tier up and box in the top tier so that there would just be one tier above your mantle, reaching up to to the flat handrail on your stair way. I would also suggest you have the drywall finished with square corners, like the rest of the drywall I see in the pictures. I noticed stepped area is the only one with rounded corners and one more reason why it just doesn't look "right". I would then paint the entire dry-walled area the same as your wall color. It might seem strange to combine the top two tiers into one larger tier, but I think it will give a good transition between the fireplace and the wall/stairway and would serve to simplify the look. - PRO
Denny Shuty
11年前Good points, BrokerIntel, You are very good at articulating the details. I am digesting what you said.
My first inclination is to remove the top tier so that more of the wall with the handrail shows. I will remove the faux leather paper. I can't paint the new section of drywall the same Dijon gold color because it doesn't exist anymore, so I can try for a computer match, but it won't be exact. I don't think I want more of the oak...
There is also a rounded edge on the display shelf in the stairwell, but I don't want to start ripping out more drywall just to get rid of the rounded edge. - PRO
BrokerInTrust Real Estate - Jane Kennedy
11年前Be sure to take pictures of the end result. I'd love to see what you decide to have done. - PRO
Denny Shuty
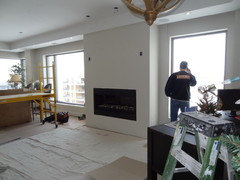
11年前Jane, Please vivit my new comment thread "Need help with wedding-cake fireplace". I am stripping away the faux leather, then plan on cutting off the top tier. I have posted an in-progress photo. Would like your feedback. - PRO
Denny Shuty
11年前Hit a snag with my fireplace re-do. Started removing the drywall that makes up the top tier of my wedding cake-like chimney and found ductwork underneath it. The metal duct angles from the wall outward, so that's why they boxed it out in steps. It was either that or slant the drywall to follow the angle off the duct. So I don't think I can remove that top layer as I had planned... 
Nancy Walton
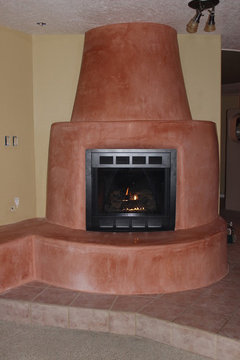
11年前I moved a pellet stove from the living room and replaced it with a gas-fired kiva fireplace: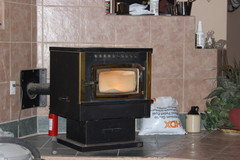
- PRO
Denny Shuty
11年前Since the fireplace is in a corner and shaped as a rectangle, not a square, I would have compound angles that would be different from each other because one side is shorter (steeper angle) than the other. 
Bruce Crawford
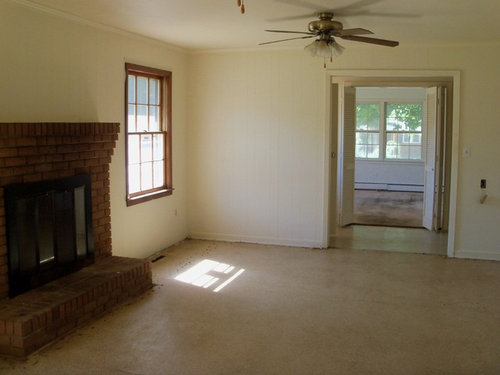
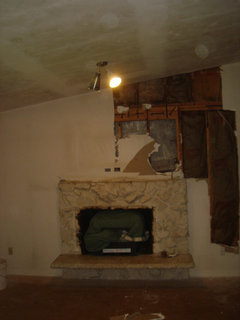
7年前最終更新:7年前Here's our make-over. The original is at bottom. Pls forgive poor quality of that photo. I took it when we were preparing to have ceiling de-popcorned. The ship's wheel on hearth was above fireplace. The original owners bought no upgrades -- anywhere. The original mantel was rough-hewn fir w/ dark stain. Owners installed pine shelves poorly constructed. When we ripped out shelves so could de-popcorn above, we decided to replace mantel. Then when it was installed, we decided to do whole wall. This was originally family room, but became dining room when we did our addition in 1983-4. Eric Prochnow of World of Moulding, Santa Ana, designed & fabricated the mantel proper using clear red oak crown moulding. It's 11'7"W, all one piece. The width limited depth of top plate due to tendency of pieces that long to curl over time. I stained and friend w/ home improvement biz installed. I designed shelf system above, friend fabricated, I stained, and he installed. The architectural pieces in shelf system are from Dubois. The painting is by h.s. friend who is art teacher. It's house where my mother and her brother spent their summers after their father was shot in robbery of his biz in '33. It was their great-aunt's house, Magnolia Grove, now in National Registry as Poole House in Dayton, AL. The pottery pieces are by my sister-in-law, who sold in studios in Tucson before retirement.


lindanewc
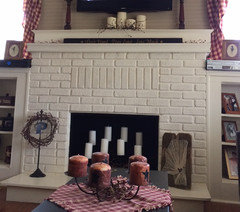
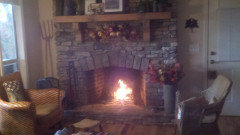
7年前3 Photos: #1 Before, #2 Inspiration, #3 Made over fireplace. I know many people don't like the TV over fireplace look, but I have a small house and moving the tv up there made the whole room look cleaned up and bigger because I got rid of a tv stand to open up a corner that now has a plant in it. Unfortunately, I couldn't find a stone as vibrant as the one in the inspiration, but I got close and am overall happy.


Lauren
6年前Linda,
The one on the right is the new fireplace.
On the old fireplace, I didn’t care for the slate-looking ceramic tile surround, the too small insert, or the mantel. I didn’t think the mantel went with the dimensions of the fireplace box. It was too tall and not wide enough.
S Hughes, I agree. I prefer the one on the right. Good thing, since it’s the new one
alphajad
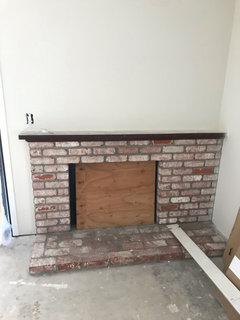
6年前Original was the leftover orange brick from exterior of house built in 1997.
Remodel done by my hardworking, multitalented hubby. Stained cedar beam, tile from Floor and Decor. Paint is SW “Shoji White”.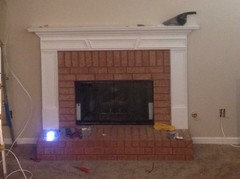


Karen
6年前This is our fireplace. We didn't want to spend a lot of money on it, it is basically for looks, we don't use it. First picture is right after we moved in. 2nd picture was a couple years later. I painted the fireplace and inside gray. The hearth was cracked concrete and still looked horrible. My DH built a box for the top of the mantle to hide the cords for my lamps and TV. Last picture is after he built a box to seal the fireplace off and built a cover to hide the cracked hearth. I love it!


 PRO
PROClaxton Fireplace Center, Inc.
5年前It does look good, there is no denying that but it's a good way to burn your house down and cause property damage and/or hurt somebody in the process. Check any version of the NFPA 211 (link below) and you will see that the National Fireplace Code does not allow combustibles of any kind to be that close a masonry wood burning fireplace or factory built wood burning fireplace (even if there is non-combustibles behind it, it doesn't change the fact that it is combustible). Even if you are burning gas logs in it, it does not change the fact that the firebox is a wood burning appliance and has to be treated as one. Even if you know that you shouldn't burn in it and are just using it for looks, no inspector will pass it when you go to sell it and the next owner might burn in it when they figure out that it is a wood burning fireplace. It's always a good idea to consult a trusted professional in your area first before tackling a project like this, for safety reasons and ultimately it could save you lots of money in the long run. Happy burning, always be safe!
http://gost-snip.su/download/nfpa_211_2003_standard_for_chimneys_fireplaces_vents_and_solUser
4年前最終更新:4年前@Omega Stone Mantels, That one just pisses me off lol. The before looked a gazillion times better. Person had to be on drugs to change that one. Wow, just wow. They took a really expensive classy mantel and turned it into a total piece of crap.
takethecake50
4年前Just maybe the bottom is the before, and the top is the after, Maybe. I do love the top

cz77
4年前Before total mismatch of granite tones with wood. After is the white one with fire glass fireplace


Dana
4年前This was in our mountain cottage. It had a flat stone face, and tiny gas fireplace, We ripped it all out, brought it out from the wall a bit and put in a bigger insert, for wood fires, and added a curve.
Sorry for the poor picture quality.


HouzzUser-785268746
4年前Any ideas for my Sausalito, CA condo fireplace? My colors LVP Hayes Oak, Ben Moore Dove Wing, Ceasarstone Cosmopolitian White, and using recycled glass backsplash. Trying to stay in that same “theme”, just don’t have a clue what to do. It’s wood burning (no gas). Thanks! I was told I should do the fireplace before the floor goes in in two weeks - so when it’s done I’ll post the “after” photos - right now just need ideas ASAP!


 PRO
PROKristin Petro Interiors, Inc.
4年前

Here's a before and after from a couple of years ago. The original was nice, but not the style the client wanted. We stained the brick to soften it a bit.

Graceful Shopper
4年前Our fireplace has had 9 lives!!! Red brick became painted brick became a wall unit. Slowly but surely.


- PRO
Hansen Wholesale
4年前Just a word of caution to all reading this post. The Jenga Fireplace covered in poplar wood is NOT a valid treatment for a fireplace and would never pass any safety inspection for the following reasons:
National Standard Building Code Information:2114.3 Masonry-built Fireplaces 4114.3.10 - All combustible mantels and similar trim shall be kept at least 6 inches from the fireplace opening. Parts of the mantel assembly located along the sides of the fireplace opening which project more than 1 1/2 inches (38mm) from the face of the fireplace shall have additional clearance equal to the projection extension beyond 1 1/2 inches. Parts of the mantel assembly located above and projecting more than 1 1/2 inches (38mm) from the fireplace opening shall not be placed less than 12 inches (305mm) from the top of the fireplace opening.
National Fire CodeThe National Fire Code dictates that any combustible material (e.g., wood mantel or similar trim) must be at least six inches from the firebox opening. An additional inch of clearance is needed for every 1/8 inch the combustible material or trim protrudes.


BrokerInTrust Real Estate - Jane Kennedy