


最近のアクティビティ

So, do you have an answer to his question?
I did answer, heat. There is no picture of fixtures or the 'bulbs' in use. A heat sink on an A19 style would be different than a MR16 which could have fins.
My personal experience with brands doesn't matter if they are used in different fixtures and styles. I've used many LED brands from Sylvania down to Dollar Store. About 1:20 of any of them fails early (so far, it has not been 20 years since LED has been available to know if you've fully achieved it's rated lifespan).

LOL
I am proud to say that I was the only one who answered his question.
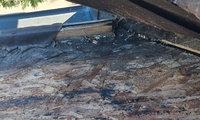
The OSB sheathing sits "below" the gutter edge because you have battens for the roof tile.
If you use a metal eave riser (a drip edge that has a raised seam for the concrete tile) it should have weep holes. You do not put sleepers on the rafters to change the slope.
Also, for the valley, the flashing does look like a tile flashing with the Z edge. It appears where battens extended over it was a closed valley, and ones that stopped short were open valleys. Choose 1 or the other.
This seems to be way out of your wheelhouse, I suggest looking at roof details for (concrete flat) tile roofs at Roof Tile Institute/Association, Western States Contractors . . . etc.
Also, at least in the pic of the 1 exposed rafter bay, there looks to be a full height birdblock which is blocking the soffit vent airflow into the attic. The blocks should be removed or cut down if they are like that in every rafter bay.
Nah, don't try and shim to get a slope to rise that 2 or 3" F up at the fascia . Remove the gutters and cut off that hack job fascia extension and lower the gutters where they should be. It was a hack job, some idiot did it, It's the dumbest thing I've seen anyone do to their roof.

Wow thanks you guys know your stuff thanks. I will look at those details right now . Im glad i haven't put the shims yet .Man after yalls inputs i realize i need to step up my roofing knowledge Immediately. I started reparing tile roofs a while back. Small jobs where the pigeons nested under overhangsand shat through the osb . Most time i would only need half a sheet of osb for the repair and now that im thinking about it i cant remember any of those repairs reaching the gutter . I did at least 60 repairs myself so i thought i was a top roofer lol. Went in this project overconfident but i knew something was off as it kinda stopped me im my tracks and i diverted to a home remodel .Im back to the roof tomorrow to get this going and do it the right way. I appreciate the knowledge Brothers I will keep you yall updated

Project the holiday laser show on that dark surface. I'm actually being serious.
I have not but would love to. that mignt help. I cannot ask this person unfortunatley nor do I want to. we want to hire someone else to modify if possible. I want to see something done to this shell of a floorplan to wow me.
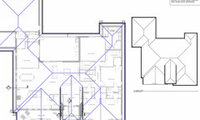
I believe your roof looks the same as in an older thread. The hip roofs are the same - not a problem (as chispa elaborated). The major changes since then, besides flipping the gable for a front porch, appears to have been in the Entry Portico, and looks something like sketched in RED here:
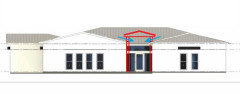
As long as the BLUE arrows are dealt with, this is a common Florida design. It appears in the OP roof plan superimposed over the floor plan, the crosshatched areas are roof crickets against portico upper walls, but not sure, it might be open. It's all a guessing game here as it was in the floor plan thread.

More of the overall space would need to be seen, and a floor plan is greatly beneficial for good advice. A fireplace will "solidify" your furniture layout, whereas without it you have more options to move furniture around. So seeing circulation availability and proportions (both in footprint and more of the vertically skinny Living Room) to understand how a masonry fireplace with a hearth extension will jut into the space and also draw your attention to the space's verticality.

The fireplace doesn't have to be the same width all the way up to ceiling/roof. You only need to accommodate the flue up at the height of the window. So, your fireplace could be asymmetrical and bypass the window although it might be rather right. In other words the upper portion of the fireplace could slope on one side so as to bypass the window.

I actually wouldn't let the small window stop you. A floor-to-ceiling fireplace can still work if it's designed as part of a larger feature wall rather than as a standalone element.
I'd consider using textured stone or large-format panels around the fireplace and then adding subtle accent lighting to highlight the texture in the evening. That usually creates a much more expensive and dramatic look than relying on the fireplace alone.
I recently compared several statement lighting ideas and before/after living room transformations that might give you some inspiration for creating a luxury focal wall:

The "problem" you're describing is common to all multistory houses. ALL. Look up "stack effect" to understand why.
The only real solution that works is to have two separate heating/cooling systems for the house. Each with its own ducting not connected to the other. One for the upstairs, one for the downstairs. If the upstairs is hotter, turn it on or set it to a lower temperature than the one for downstairs. Without separate systems, in one of my homes, I need to run the A/C long enough for the upstairs to reach the desired temp, as at night before bedtime. Doing so makes the downstairs colder than we prefer but that's the solution.
Zoning rarely works well or reliably.
@klem1:
"If you have the desire and determination, I'll attempt walking you though tests to get some idea of why this is. No silver bullet , just hit and sweaty work inside attic."
Also @klem1:
"people come to Houzz for silver bullets, not a list of things they can do to help diagnois/solve their problems."
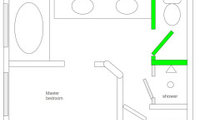
This is a concept only, as the drawing is not precise enough. But trying to meet your main statements - a shower in direct natural light, probably forgo tub, privacy for toilet, not sure yet what to do with windows, and maybe keeping the main doorway open:
- the shower shouldn't have standard windows of any size unless it's a transom, so placing where the tub is doesn't seem a good option;
- adding a pocket door for main entry would be unencumbered when open or can close it;
- toilet shared wall with shower can be a pony wall without a door to take advantage of it's window (if you add the main pocket door), or have a door with a full wall;
- vanity can be floating to allow full shower glass, or have a pony wall - appetite for window work and style of bathroom will determine vanity and windows;
- closet enlarges, and have option to have a separate door into room.
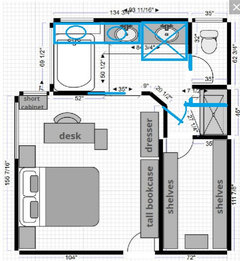
In some manner the waste pipe for the tub and vanity route towards the toilet stack, so that branch should be adequate for a shower.
As far as the side window, it may currently clear the height of vanity, if not you can set the vanity back from wall (floating or furniture style). For the back window, if you put a shower there the window should be changed to a transom or eliminated, which is the same choices for a vanity. The windows only remain as is if you keep the tub as is, any work there will probably have some decisions that need to be made on at least the back window.
A standard window unit is not designed to shed water from the inside. No interior-side weep holes, the way the sash and frame extrusions are designed, the lock assembly, etc, water can get into the frame and then down inside the wall. The window unit is separate than the sill of the wall, which can be waterproofed just like the shower walls. Also, soap scum/product splash and how to clean on a standard window. Consider there are codes, best methods, and proprietary products for waterproofing shower walls, but the window is a giant opening that seems to be always overlooked.
So you either place a transom window above the direct line of water, or you purchase windows that can stand up to the water from inside (e.g. storefront style, custom glass, etc).
Privacy glass is another subject that has nuance that is also often overlooked. Frosted is not complete privacy because it allows a shadow show, some methods of "privacy glass" allow clear or just a distorted view if your eye is very near the glass, and privacy for some methods differ between daylight and nighttime light. Consider the nuances when choosing your own privacy comfort level.

Good advice from @dani_m08 - when i mentioned cords earlier i was thinkng about the desk floating in the bedroom, sorry for any confusion
I like those swinging doors! I was thinking about having the option to keep a separation between the toilet and sinks for sanitary reasons , even if only a half wall. Cleaning a cupboard side with harsher cleaners does definitely degrade it more. Maybe I attack it with too much gusto. Ha ha
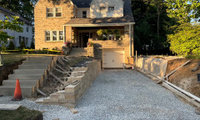
Control joint placement is based on slab thickness and also any abutments/protrusions/voids/corners in a slab.
For a typical 4" nominally thick driveway slab, that places field joints around 10' spacing.
However, they can also be aesthetic while still meeting spacing guidelines, and you can always add more than guidelines (which are set to accomodate curing shrinkage) in order to achieve a look.
@simplynatural's layout works well aesthetically. Be sure to give a drawing of it, not just verbally discussing. Tape a copy of the drawing to the garage door. Also make sure there is expansion joint material against the vertical planes (retaining walls, house).
Playing on what has been previously mentioned, what about putting two joint lines one center on the door and the second on the side of the door. This would divide the drive in three nearly equal sections.
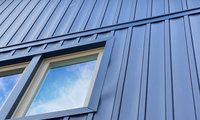
The canning at the window appears that the nail fin is on the left, and probably cut out for the window, so probably not fastened.
The field canning could be from bending the piece as they carried it, missing the slot with the nail, or not allowing the proper expansion room at top and bottom.

Thank you 3onthetree
Your best bet is getting a mfger's rep involved.
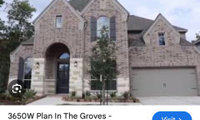
The 2nd picture is of an actual model home (garage door not installed yet). So with this, and what Perry appears to be, is a tract home builder in planned unit developments. Which would mean that the elevation cannot be redesigned, you pick from set styles. Verify with the exact development location what you are able to customize with them so you are not spinning wheels.
I would go with the simplest style you can (tends to age well) and then add drama and interest with fabulous landscaping — the current trend is homes with lots of different materials, shapes and “details” tacked on the front and then really anemic landscaping (looking at you boxwoods) - flipping this script will yield something with staying power imo
Thank y’all for the added input!

"observe how moisture is travelling through the block"
"a masonry specialist who says everything can be externally fixed or run inside"
These two statements unfortunately say that you should not be finishing the basement yet. You need to fix the water infiltration. Unstated, but guessing water is coming through the blocks and at the slab/floor, and you probably have lots of efflorescence residue. That means it is sitting outside against the CMUs, continuing to deteriorate mortar joints over time, and entering and filling the bottom course cores (still sitting there).
You may have done some remediation work outside, like gutters/downspouts and grading, which is keeping water at bay for the time being. But it is just a matter of getting, say, a sustained rain for a couple days, or a 100 year rain every few years, and you are now back to having water infiltration.
Nothing can be applied to the interior of the CMUs to prevent it. The best solution is excavating outside, installing a footing drain tile (to interior sump pump), waterproofing, and a drainage plane. This will reduce hydrostatic pressure and eliminate the problem with the deterioration and cracking of mortar joints.
But that is the most expensive, so the next and most often chosen solution is a compromise, a less-effective method of an interior retrofit perimeter drainage system. They trench around the interior perimeter and install a pipe connected to a sump pump. This is not 100% effective for every house, and does not eliminate water coming through the wall or all hydrostatic pressure, or continued deterioration of mortar joints. But it is 1/3-1/2 cheaper than the proper solution. It also compromises your interior finishes as you have to collect water still coming through the wall.
Your solution of all interior CMU is probably not thought through completely. You will have to demo the concrete slab in order to pour thickened footings to support where walls occur. All electrical will be in conduit, or for an uninterrupted look, be run inside the block (laborous). There might be some difficult details complicating your desired look where CMU meets any ductwork and pipes that are typically present in the basement ceiling. If you need permit, basements do have to be insulated.
There are three ways mold can happen specific to a basement:
- ground water infiltration
- condensation from the incorrect method of insulating and finishing perimeter walls
- sump pump failure
All have been solved to where it is not a high risk to finish using wood and drywall.
I agree this issue has not been dealt with in the proper way and until you advise what was done there is no way to help with what you want to do.
It's decided the OP is doing brick with stone, and brick/stone/siding will be in the only scheme as the elevation shows, there is no option otherwise. OP can only receive color palette advice.
The choices are set in packages - for each brick choice, there are 2 mortar colors, then there are 2-6 corresponding stone choices, then 3 corresponding choices for paint in a Light/Medium/Dark grouping:
And not to make it even more complicated, but usually in a planned unit community, adjacent houses cannot be the same exact elevation and colors. So double checking you've double checked that all packages are available, and with that, that the builder is able to obtain all choices of the brick and stone for this project timeline.
#2, all brick, in that tone, definitely the two car garage. Not loving the shutters, even though they are the correct shape. Keep it simple to start. Do you have a choice of window colors? I like this look for your new home.
Where did I ask for people to lie to me or rave about my choices? I simply asked for some advice on color schemes and got a lot of unsolicited advice that was unrelated to what we are doing. If y’all are professionals, I sure hope you practice more restraint in your professional lives. Otherwise, I would highly recommend learning the art of that, it will get you much further in life and be far more meaningful than designing a pretty home.